
How to Make Ricotta Cheese at Home
Stop what you’re doing. Drop everything right now and go make this homemade ricotta cheese! Your life will never be the same after you’ve done this once.
All it takes is milk, salt and white vinegar. Heat the milk, add vinegar to curdle it, let it rest, then strain. Use whole milk and heavy cream for a rich, thick ricotta, or 2% milk for a lighter one.
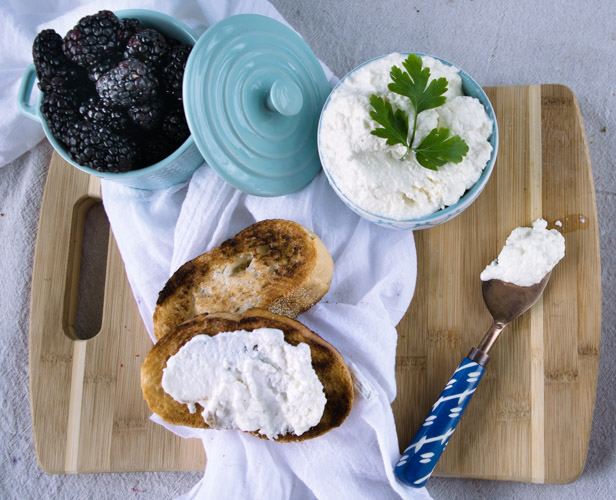
The Best Homemade Ricotta Cheese (Just 3 Ingredients)
I always want to make everything homemade, and there are several reasons why. Number one: making food fascinates me. Grabbing a couple of simple ingredients and turning them into something stunning is an art form. It soothes me.
Number two: I know exactly what is going into my food. When I make bread at home, I use flour, yeast, salt and water, sometimes milk or olive oil. It’s a few simple ingredients, not fifteen, including five I have no idea what they even are.
Number three: I like to impress my guests. Let’s face it. When you say you’ve made stuffed manicotti with homemade ricotta, your guests will stop eating and oooh and ahhh even more over the food.
And my final reason: it. just. tastes. better! SO much better! I dare you to make this homemade ricotta cheese recipe just once, compare it to the store bought one, and then let’s talk.
I have two different versions I make. One takes whole milk and heavy cream, which is much richer and thicker because of the fat content. The other takes 2% milk, which has less fat and fewer calories. Even though it’s a little thinner, the taste is still incomparable to store bought ricotta.
You bring milk almost to a boil and add vinegar to curdle it. Let it sit, strain and then enjoy. That’s it! It doesn’t get any easier than this. It’s magical what happens. You’ll see. You will never be sorry you made this!

Why You’ll Love Homemade Ricotta
- Only three ingredients. Milk (with or without cream), salt and white vinegar.
- Two versions. Whole milk and cream for richness, or 2% milk for a lighter cheese.
- No special equipment. A saucepan, a mesh strainer and some cheesecloth are all you need.
- Better than store bought. Fresh, creamy and mild, with nothing extra added.
Ingredients You’ll Need
Exact amounts are in the recipe card below.
- Whole milk and heavy cream: This combination makes the richest, thickest ricotta because of the higher fat content. The curds come out soft and creamy, perfect for lasagna, manicotti or spreading on toast. Use regular pasteurized milk, not ultra pasteurized, which is heated to a higher temperature and often won’t form good curds.
- 2% milk (lighter option): Use a half gallon of 2% milk in place of the whole milk and cream. The ricotta has less fat and fewer calories and is a little thinner, but it still tastes far better than store bought. It needs a longer rest and a longer drain.
- Kosher salt: Seasons the cheese while it heats. Kosher salt dissolves easily and has no additives. Taste the finished ricotta and add a pinch more if you like.
- White distilled vinegar: The acid that curdles the hot milk and separates it into soft white curds and thin, yellowish whey. Plain white vinegar has a clean, neutral flavor that won’t flavor the cheese.
- Cheesecloth: Two layers inside a mesh strainer catch the small curds and let the whey drain away. A clean, thin kitchen towel can work in a pinch. Rinse the cloth with water first so it doesn’t soak up your whey and curds.
- A heavy saucepan: A heavy bottom spreads the heat evenly so the milk doesn’t scorch while it heats. Pick a pot that holds at least 3 quarts so there is room to stir.
- A mesh strainer and large bowl: The strainer holds the cheesecloth and the bowl catches the whey. Make sure the bottom of the strainer sits above the liquid as it collects.

How to Make Homemade Ricotta
- Heat the milk. Combine the milk and cream (or just the 2% milk) and the salt in a saucepan. Heat over medium high, stirring occasionally so the bottom doesn’t scorch.
- Watch closely. Don’t let the milk boil. As soon as you see the first bubble rising, turn off the heat. Stay close to the stove for this part, because milk heats fast at the end. You will see steam and a little foam around the edges just before.
- Add the vinegar. Immediately stir in the vinegar. The milk will curdle right away into white curds floating in thin whey.
- Let it rest. Cover the pot with a clean towel and let it rest for about 10 minutes, or about 30 minutes if you’re using 2% milk.
- Set up the strainer. Line a mesh strainer with two layers of cheesecloth and set it over a large bowl to catch the liquid.
- Strain. Gently ladle or pour the curds and whey through the strainer so you don’t break the soft curds into tiny pieces. Drain for about 1 hour if you used whole milk and cream, and longer for 2% milk. For extra firm ricotta, put the strainer and bowl in the fridge for a few hours. The longer you drain, the firmer it gets.
- Chill and enjoy. Stick the ricotta in the fridge to firm up, and voila!
Tip: Both methods are pretty much the same, but when you use 2% milk, let the curdled milk rest a little longer (about 30 minutes) before draining it.

Ways to Use Homemade Ricotta
- Stuffed pasta: Fill manicotti or shells, or layer it into lasagna.
- On toast: Spread it on warm toast with a drizzle of honey or sliced tomatoes and olive oil.
- In salads and bowls: Spoon it over roasted vegetables or a caprese style salad.
- Sweet treats: Stir in a little honey and serve with fresh berries.

Homemade Ricotta FAQs
- Whole milk or 2% milk? Whole milk with heavy cream makes richer, thicker ricotta. 2% milk makes a lighter ricotta that is a little thinner but still tastes better than store bought.
- Why didn’t my milk curdle? The milk may not have been hot enough, or it may be ultra pasteurized. Heat it until the first bubble rises, and use regular pasteurized milk.
- How long should I drain it? About 1 hour for whole milk and cream, longer for 2% milk. Drain it in the fridge for a few hours if you want it firmer.
- Can I use lemon juice instead of vinegar? The recipe was written with white distilled vinegar. Lemon juice also curdles milk but adds a light citrus flavor.
- What can I do with the leftover whey? Many cooks use it in place of water in bread dough or smoothies. Refrigerate it and use it within a few days.
- How long does homemade ricotta last? Keep it covered in the refrigerator and use it within 3 to 4 days. Discard it if it smells sour or looks slimy.
- Is the whey supposed to look yellow? Yes. Thin, slightly yellow or greenish whey is normal, and it means the curds separated well. Cloudy, milky whey means the milk needs a little longer to rest.
- Can I freeze ricotta? You can, but the texture turns grainy after thawing. Frozen ricotta is best for baked dishes like lasagna.

Homemade Ricotta
Ingredients
- 5 cups whole milk plus 3 cups heavy cream or Half gallon 8 cups 2% milk
- 1/2 teaspoon kosher salt
- 3 tablespoons white distilled vinegar
Instructions
- Mix milk, heavy cream (or just 2% milk) and salt in a saucepan. Bring it to the stove, at medium high heat, stirring occasionally. Don’t let the milk boil. Keep watching it closely. As soon as you see the first bubble rising, turn the heat off. Immediately add the vinegar and stir. The milk will curdle. Cover it with a clean towel and let it rest for about 10 minutes (30 minutes if you’re using 2% milk). Meanwhile, line a mesh strainer with two layers of cheesecloth and put it over a large bowl to catch the liquid. Pour milk through the strainer and let it drain for about 1 hour if you've used whole milk and heavy cream and longer if you've used 2% milk, I usually put the strainer and the bowl that is catching the liquid in the fridge for a few hours. The longer you drain, the firmer your ricotta is going to be. It’s magical what happens. You’ll see. You will never be sorry you made this!
Made homemade ricotta? Leave a star rating in the recipe card and share what you made with it in the comments below. Your feedback helps other cooks.
This recipe was shared by Camila.


One Comment
Comments are closed.